Polaris ATV Forum banner

Not getting fuel to carb?

73K views 32 replies 5 participants last post by  stave7119  
#1 ·
I?ve been picking apart what may be a clogged fuel system, I?m getting good fuel from the tank to fuel switch, it was very hard to blow air through the switch (now blown out).... cannot blow any air through the fuel pump (ordered a new one).....rerouted a fuel line from the tank to carb, is gravity feed enough to fill the bowl? The drain plug is out of the carb and not getting any fuel draining by gravity alone...
 
#2 ·
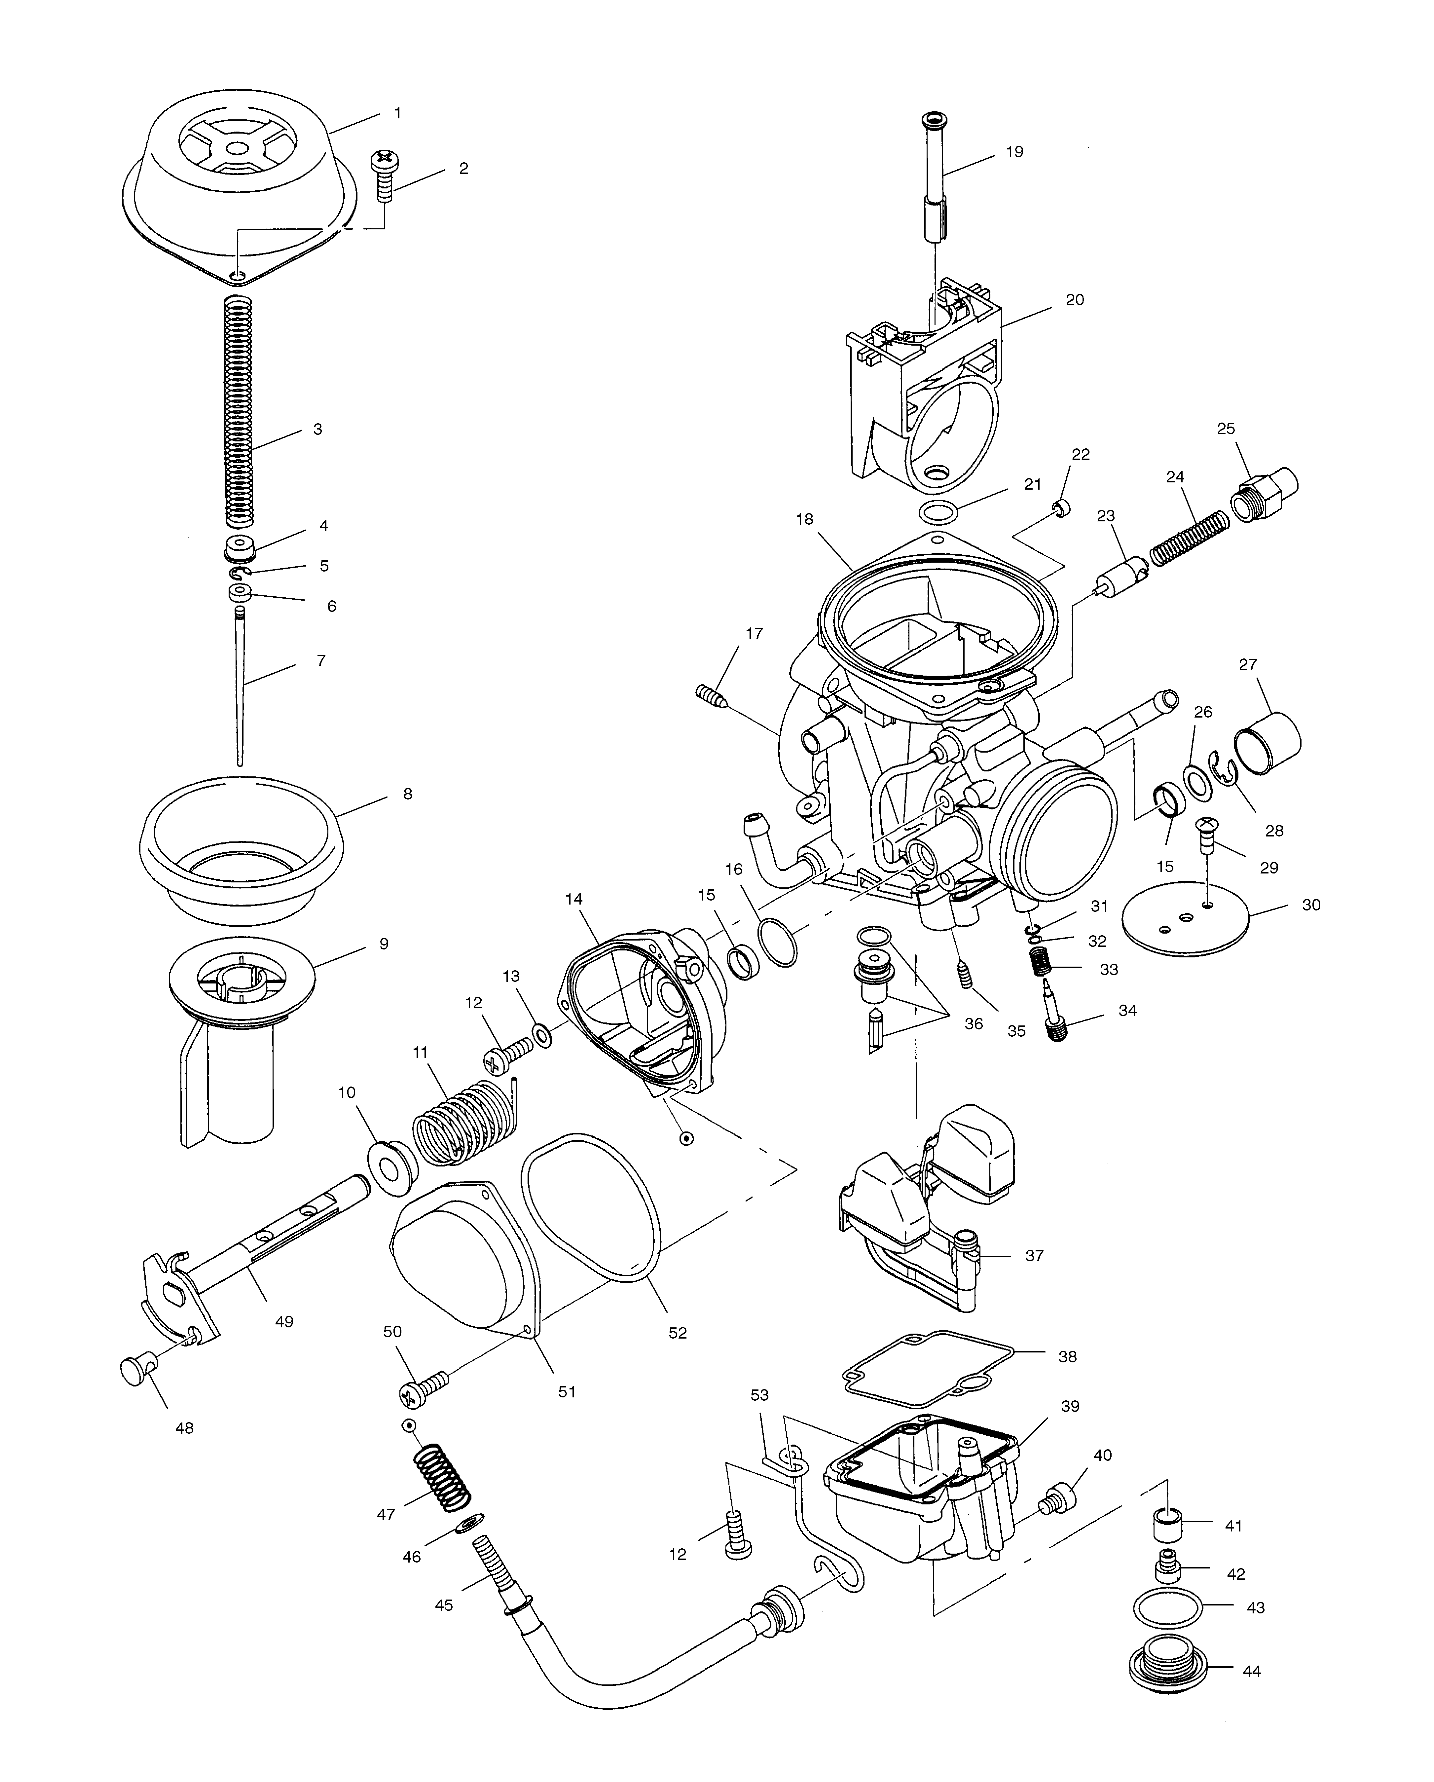
I was having fuel delivery problems on my 1998 Sportsman 500 and ended replacing float needle, needle seat, fuel lines and fuel shutoff. For a vacuum operated pump, you likely will not be able to blow through it without the vacuum pulse. The diaphragms in a pump are very thin and might have to be replaced if torn or old.

To narrow down the issue without jumping in and replacing everything, disconnect one line from tank at the shutoff and check for good flow, check both reserve and main fuel lines. Then reconnect and check for flow after shutoff turning switch to all 3 settings. Then make sure lines are all connected correctly and pull line that would go to carb and crank the engine over, it should be a good flow or pulsing flow or gas.

If it has not been done already, should figure on replacing needle and seat, fuel lines and fuel shutoff once running. My carb and shutoff allowed gas to overfill into brand new oil, which can damage engine if not drained, fixed and oil change.

Hope this helps!
Isaiah
 
#4 ·
The vacuum pulse would be from the engine to the fuel pump and creates an amount of fuel pressure to carb. The pump is under the left side plastic ahead of the fuel shutoff. There should be good suction at the mouth of the carb when cranking the engine over.
 
#6 · (Edited)
Ok, good deal. Are you getting good gas flow from the line going to the carb? Try with cranking and without cranking engine over.
Edit: how do the gas lines look? Old lines look and feel brittle or spongy and should have a date printed on them. There should be solid gas flow on the lines going from tank to switch.
 
#7 ·
Not getting great flow they the switch and nothing from the pump....ordered both, all fuel lines are new......guess I?m just gonna have to wait on parts, sucks dealer is so insanely expensive....had to get carb drain screw from dealer $12
 
#8 ·
Parts are pretty pricey on these, good news there is a good amount of aftermarket parts on ebay and other sites for common parts, which helps.
I have found bearings and fuel system parts that are interchangeable and therefore cheaper, but applocation specifics like seals and gaskets are the expensive stuff and have had get oem replacements online.

Let us know how it turns out!
 
#9 ·
Get the new fuel pump on and it?s pumping like crazy now!! However, I?m still not getting anything into the bowl on the carb. I verified that I?m getting good flow thru the filter and lines, but when I pulled the drain screw after cranking for a while.....NOTHING. Guessing the carb is stopped up. Should I be able to blow air thru it with the drain screw out?
 
#10 ·
Clean the carb!

...
Should I be able to blow air thru it with the drain screw out?
It will only solve the problem temporarily, the dirt/grim is still in the carb floating around ready to plug it up again.

Do it right and at least clean the carb, here's how: The BST-40 Bible | Adventure Rider

This shows a Mukini BST40 yet all the jets are in the same place as yours a BST34.

Here's how to tell the difference in both carbs and other cool info: https://intl.polarisdealers.com/virtualmaster/stopsitefiles/servicemanuals/atv/9915083_ch_04.pdf

Learn both of these and you'll solve all your carb problems. :cowboy:
 
#11 · (Edited)
Definitely time to clean the carb then. Be sure to replace needle and seat since you will have it off. Check the bowl gasket for cracks and be sure to check all jets!

Check back if you need any help with that, it will take a few hours getting off, cleaned and replaced with how tight everything is on the bike.

Edit: I usually let parts soak overnight in container of simple green, then pull a bristle from a wire brush to very carefully clean the holes in the jets. Be sure not to enlarge the holes at all and that the wire is not too tight of a fit that it could break off and have to replace jet.
 
#13 ·
Very sorry to put a damper on things! It's not likely that carb cleaner will help, since the fuel needle has a rubber tip and carb cleaner dissolves most rubber. Without having the carb off to check, there may be other issues than blocked fuel flow.
It is not particularly laborious work, mostly time intensive. If you do not have experience working on carbs, take a lot of pictures as you go, from removing cables and screws on the bike to opening up the carb. Plastic zip lock bags and a sharpie might be worth the effort to keep track of screws and other bits.

There are lots of videos as well that may be of help if you tackle it.
Most of my experience was started working on carburetors and grown from there. These are not too complicated, just removing from the bike is some of the hardest part.
All the best!
 
#15 ·
Generally I shy away from the cheap aftermarket carbs. Multiple posts here where the carb didn't work for one reason or another. And you can't get parts for them. If it has the wrong jets in it for your application, the OEM jets won't fit. Just because the listing says it "fits" your application doesn't mean it will work right. IMO you are much farther ahead to rebuild the one you have. As previously posted, it just takes time. Don't get the parts from Polaris, they don't sell a kit. Everything has to be purchased separately. Your dealer should be able to get you an aftermarket kit that has all the parts you need for that $45. I would bet that is what they use when they rebuild a carb. Or get the correct one from Ebay.

Good luck with the project!
 
#16 ·
I bought a carb rebuild for around $15-20 earlier this summer. I only used the needle and seat and bowl gasket.
Stave, do you have any idea if those be gotten at the dealer? The jets on the kit I got were not even close to being correct size so I cleaned and reused originals.Do you know if the Shindy or any other kits are OEM quality replacements?
 
#20 ·
I am guessing you are working on a Mikuni Carb. For the choke, I unscrew the big nut from the carb body. I had to make a special wrench to get in there though. I used a cheap wrench from an old motorcycle tool kit and ground it until it would fit. One of the guys at the shop modified a flare nut wrench to fit in there. When you unscrew that fitting, the cable with the plunger will come out.

To get the throttle cable off, you have to release it from the throttle lever first. Inside the housing on the side. Push and hold the lever up to get slack in the cable then turn the cable 90 degrees to the lever and slide it out toward you. Careful not to lose the little brass end. After that you can unscrew the nut at the top and take the cable out.
 
#18 ·
I bought a carb rebuild for around $15-20 earlier this summer. I only used the needle and seat and bowl gasket.
Stave, do you have any idea if those be gotten at the dealer? The jets on the kit I got were not even close to being correct size so I cleaned and reused originals.Do you know if the Shindy or any other kits are OEM quality replacements?[/QUOTE]

I have gotten the Moose kits I think. Dealership orders kits from Parts unlimited. Never had a problem with jets not being right. If all you need is jets, your dealership can get them or has them on hand. Take the OEM pieces from your carb with you and they should be able to match them. Otherwise they can get them from Polaris. Only a couple bucks apiece.
 
#19 ·
Unless I missed it you've never said WHAT machine's carb you're working on?? I'll assume its and old sportsman 500? If so, the choke simply unscrews (25) but you might need a 12mm open end wrench. The throttle cable is under the plate on the side (3 screws). Then you have to roll the throttle shaft (49) around with your thumb to get slack in the cable and wiggle the cable end and little brass keeper (48) out and free. Don't lose the little brass keeper...it costs about $15!

Image
 
#23 ·
Not terribly easy, but once you get it, you will remember next time.

For throttle, turn throttle body #49, in the diagram above, to give slack in the cable and reach in carefully or with needle nose and line up cable with slots in #49, it might take some finesse, but should slide out when aligned.
For the choke, loosen the bigger brass fitting on the side of the carb - #25 then pull spring back carefully and slide cable out of #23 and set spring and #23 choke slide aside.

Hope this is clear to give an idea of how it works!
 
#24 ·
When you do get it off, no need to take it all the way apart like the diagram shows. There a plenty of videos for sportsman, explorer and other quads that use your model of carb that can help step by step. Be very careful removing the top of the carb and the diagphram, they can be ripped or dissolved in strong cleaners. I stick to soaking in simple green since it's cheaper and effective.
 
#26 ·
Great job!
What do you have to soak it in? I would highly suggest replacing fuel needle and seat which is part #36. Is that the one that is stuck? If you replace, it doesn't matter if you damage o ring removing it.

Carefully remove parts 31-34 - screw, spring, tiny washer and tiny o ring. Can use a thin wire bent at the very tip- about 1/16 inch bent to gently pull up.

Be sure to pull off any rubber seals or gaskets and diagphram before soaking.
 
#29 ·
Take a look online, quick check came up with WD 40 should be safe and effective if you have no other choice but to reuse the old parts since you are on a deadline. If you can get new parts, soak it with carb cleaner, but I would try wd40 or other options tonight. Carb cleaner evaporates too quick to get everything off for me.
 
#30 ·
If you want to try to reuse the parts, you can usually take needle nose pliers and get hold of the needle body and twist slightly to break it loose without damage. Cut a Q tip in half, chuck in a drill and use metal polish to shine up the seat and polish the needle tip. Clean all the jets and orifices good and blow with compressed air. You can sometimes get away with a cleanup if you need it quick and parts are not easily available.
 
#33 ·
Not surprised that a dealership wouldn't have a Polaris needle/seat, but am surprised that they wouldn't have a rebuild kit on hand. Just seems to me that would be something they would keep in the parts room. They can get them in just a day or so, but still....

Sorry you didn't get to ride.